Roben-Marie Smith

Roben-Marie Smith


THIS AND OTHER  PRODUCTS AVAILABLE AT

       IS A REGISTERED TRADEMARK


 sandi-keene

Roben-Marie Smith

Blog Index
The journal that this archive was targeting has been deleted. Please update your configuration.

Entries in In My House (16)

Wednesday
Dec042013

art stuff: something pretty to remind us

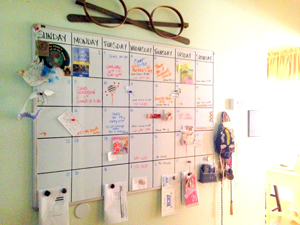
We use A LOT of magnets around our house, especially considering the size of our magnetic family wall calendar, but most of them aren't pretty. They're functional, heavy duty - meaning they can hold up a stack of papers three inches thick for the next Junior National Honor Society Meeting.

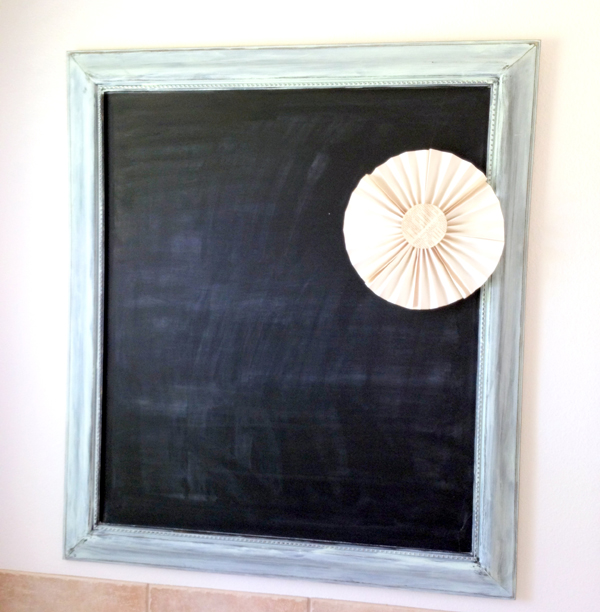
Adding just a pop of color and ART to this board makes it so much easier to view - overloaded schedules and all. This is our family calendar- not pretty, but useful.

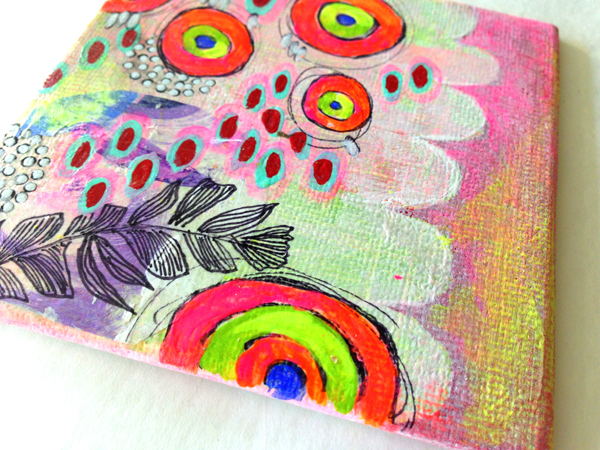
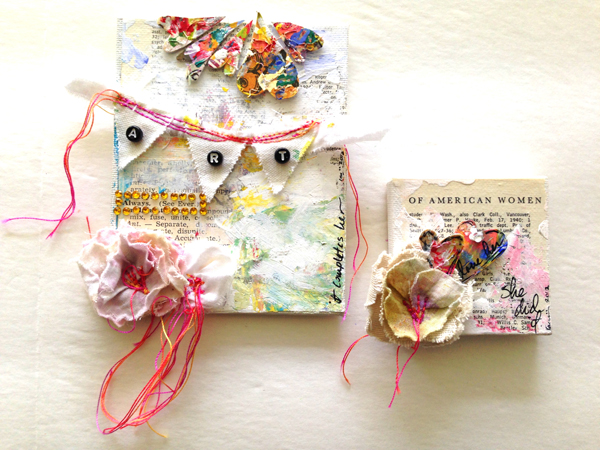
Now this is is pretty. And fun. A little painted canvas turned into workable magnet. We have started using these on our family calendar to remind us of something important.

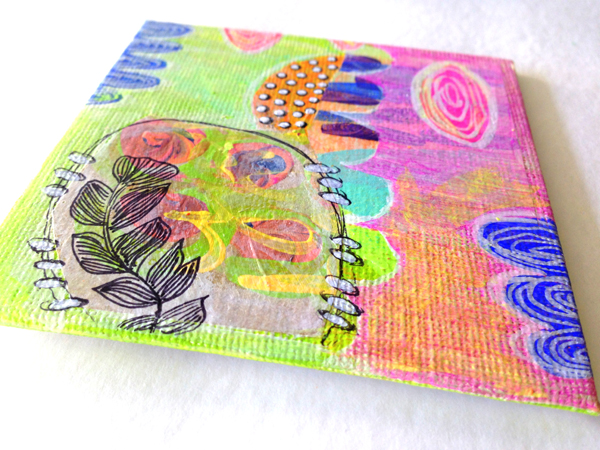
( Plus we reserve these ART magnets for special tidbits - like love notes and free tickets! No tacking up a yucky dentist appointment with these - fun stuff only! )

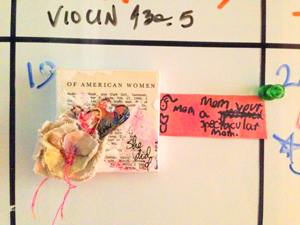
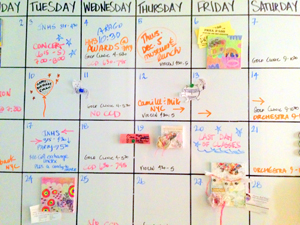
Sometimes all we need to feel better about our crazy schedules and hectic lives, is just a little bit of ART. Everyday life can be so routine that we dread it. That's why anything unexpected makes it so much better- like a secret note, or a child's drawing-  things that are visually pleasing. I don't like to LOOK at my family calendar. It is almost always overwhelming, but by adding a little bit of pretty, I get an unexpected smile from myself. I am reminded that eveyday life can be beautiful- I just have to help make it that way.

December is not so bad, but most of the time our calendar is overflowing with stuff to do, places to be, people to meet. Having something pretty to remind us to slow down, have fun, and LOVE YOUR LIFE - well that's worth looking at.

Thursday
Oct312013

in my house: happy halloween

...wishing you all a safe and fun filled holiday!

Read more about how I made this sweet All Hallows Eve Banner,  this Yummy Triple Decker Candy Dish and this Spooky Stack of Vintage Books!

Friday
Jul052013

tutorials: chalkboard wall art

I am sharing an easy tutorial today! Chalkboard Wall Art.

This pretty chalkboard is so easy you can make it in just a few hours. To start with, just shop your home for a piece of framed wall art that you are not using or are ready to change up. Tape off the frame and grab some chalkboard spray paint. I like to use Rust-Oleum because it covers so well and doesn't seem to drip.

Next I spray the glass of the wall art according to the directions on the paint you are using. The hardest part for me was waiting in between coats, but it is important to follow this step. I sprayed two coats. Once your final coat is dry you will need to season your chalkboard. To do this you simply rub the entire surface with the a piece of chalk and then erase it.

After I seasoned my chalkboard I took the painters tape off and mixed up some craft paint to spruce up my frame. I mixed white and mint green to get a pretty coppery green color. After I finished painting, I immediately sanded the entire frame lightly.

Waaalaaa- you are done! This is a super easy way to change up your wall art while only spending a few pennies on supplies.

Easy, cheap and re-purposed!

Saturday
Jun082013

on the worktable: crocheted baskets

As part of my yearly goal to decorate on a dime I am trying to shop my home and create things that I would normally buy. I loved these pretty crocheted baskets but had to stick to budget on my bedroom makeover so I decided to google a pattern instead.

I feel I should mention I am not a seasoned crocheter! I am self taught and I can tell you practice makes perfect. This was a very simple to follow pattern and at no point frustrating. I haven't added the fabric stiffener yet per the instructions, but I still might. I really wanted this basket to remain soft looking and I am worried the stiffener will change that look. We'll see. Anyway- I love it and I think I will make a few more and cluster them together on a nightstand or desk to keep things clutter free!


Thursday
Jun062013

In my house: bedroom redo

...I get a wild hair once in awhile. Okay, often. I get a wild hair often. What else can I say? Stay tuned...

Tuesday
May212013

in my house: living room redo part 2

So - I am finally ready to share my Living Room with you. Back in February I posted part 1-  what prompted me to redo my living room. I know it took me two months to get back to this, but I wanted it to be complete when I shared it with you again and with the exception of the finish on my coffee table it is all done!

Two items on my BUDGET BOARD were my intended focal point and grounded the room perfectly - this furniture and my antique chalkboard. I gave my old toss pillows a face lift with burlap & duckcloth shams, adding linen ruffles and medallions. The wreathe is one I made with recycled materials.

I tackled the dark laminate tv cabinet with one coat of this primer and two coats of this awesome paint which I had tinted to Natural White. Once dry, I sanded the cabinet roughly with an electric palm sander, creating deep grooves and rounded edges.

I loved the gray with the hard wood floors, so I opted to tie in a few antique pieces. I gave an old dresser a new coat of my favorite wax in Natural, and it now serves as added storage for games, coasters, and blankets. An oversized library table gets the same treatment and houses school and kids arts and crafts supplies.

I don't like things to be "matchy matchy" so I tied in a few old chippy painted pieces as well. I am in total love with this green side table. It just so happened to match my walls perfectly - which are painted a very pale shade by Ralph Lauren called Killington Traverse. This little round beauty still shows signs of the original floral tromp de l'oeil design visible on the table top surface.

I went ahead and bought the wooden lamp base at Target but found my burlap shade at Wal-Mart. The floor lamp also came from Wal-Mart. I just swapped out the original shade for this one.

 Because my Kitchen and Living Room are basically one giant room, it was mandatory that they tie together seamlessly, without being exactly alike. I was able to achieve that with color. The kitchen cabinets are a coordinating shade of white and the antique gold curtains picked up the warm hues of the wood and burlap. I like the cohesion this rug from Ikea gives the entire room and since my kids love to hang out on the floor I made two oversized floor pillows using duck cloth and left over linen and ribbon scraps from Christmas projects.

The small things on my BUDGET BOARD were easy. Metal trays and vintage ice buckets were picked up for pennies in local shops and at goodwill. Grainsack material covers a recycled oversized pillow. I had fun embellshing it with burlap and a hand crocheted flower with a vintage bling center. Books and more vintage trophies filled with flowers line the cubbies on the tv cabinet and giant metal stars I lugged back from PA years ago got a new coat of silver paint and hang on the walls.

I love it. That is a surefire way of saying I will tweak it down the road, no doubt, but I do love it.

Tuesday
Apr302013

my style: sneak peek fancy photoshoot fun

My baby was twelve last week. Not possible, but they tell me it is true. I surprised her this week with a trio of special friends and a fancy photoshoot and tea party! I will share more photos later, but could not resist this one sneek peek. Baubles, bubbles, crowns and glitter - what could be better?

Sunday
Apr072013

live the repurposed life: lemon frogs

We already know I am of the nature to re-purpose anthing I can. Glass jars are by far my favorite recyclable though. I use them for just about everything, in every room in my house as you will see here, herehere and here. So rather than buy a vase - grab an empty candle jar and some fruit!

Once I have my stems inserted into the slits, fill a jar with water and gently place your new lemon frog in the bottom. Add a bit more water to cover top of lemon if needed. Try this in the Fall with a miniature pumpkin or squash!

Pretty - Functional - Recycled. Enjoy!

Friday
Feb152013

in my house: living room redo part 1

This is my BUDGET BOARD. It is a board of all the items I wanted to see in my new living room makeover. It was really crowded at first, but then I remembered I actually HAD a budget and so some things fell off of the board.

This is what prompted the board. A simple but fatal mistake when it comes to me and decorating - I moved something. Just one thing.

And I had motive, two motives actually. My family of seven had been enjoying these WHITE LINEN sofas for over six years. And while they certainly proved their worth, this lovely dim photo doesn't show their true loving wear & tear. The second motive being this beautiful (uhum) laminate TV wall unit. It was the only thing I could find to fit. That's all I will say about it.

This is similar to how it looked at the store. I loved that it filled a big empty wall. I loved that it will so slim - the shelves only about 18 inches deep. I loved that it was super sonic cheap. I DID NOT LOVE, NOR WILL I EVER LOVE the dark color. I couldn't even find a photo of mine if that tells you anything. But what I did LOVE was this.

I took a dark, laminate, Target Library Table and turned it into this shabby white beauty. (See how here) And so I wanted more of this... If you would like to see how it all turns out, check back often. I will have it all done and ready to post soon! And it is GOING TO BE PRIIIIITTTTTTY!

Monday
Dec242012

In My House: Wall of Mirrors

I don't know about you, but I spend more time at my desk than I would like to admit. I have always been a firm believer that you have to "love where you work," so I try to surround myself with things that make me smile, like vintage pots and old wooden cubicles.But really - LIGHT is a big deal for me. It makes me smile. I am very grateful to have huge porches that wrap the front and back lengths of my home, and while they create great cooling shade here in Florida, they also filter most of my sunlight.


My desk sits near three over sized windows in the nook area of my kitchen, but even so it was too dark for me. I decided to bring in more light by adding a pretty mirror over my desk. It reflected the light beautifully and I enjoyed the perk of being part of the living room, just by way of reflection, but...

...but it was so small. Every mirror I picked up was dwarfed by the size of the wall above my desk. I tried hanging vintage plates alongside of and around the mirror, but it just wasn't speaking to me. Finally it dawned on me. I needed a whole wall of mirrors. Sounds weird right? I know, but it is working for me! I have been slowing adding to my "wall of mirrors" and I am loving it. I started with one hexagonal mirror centeredabove my desk. I began adding a few rectangles which are faux gold (you can't even tell they are plastic!) rectangles that I found at my local Dollar Tree for $1.00 each! Yea to that!


Last week I stumbled upon a four pack of miniature mirrors in assorted shapes at Wal-Mart. I hesitated because they were black, but in the end I bought them and added a coat of off white paint followed by a coat of first silver and then gold paint. Without waiting for these to dry,(too impatient for that) I quickly rubbed on a coat of saddle brown leather stain and then wiped it off. I love how it took some of all the layers of paint with it making it look worn and old. I also found a small faux gold filagree square mirror that day at my local thrift store.

And then just yesterday I found my favorite so far. A vintage oval mirror with raised metal sides. I have one similar to this that I use for a perfume tray and I love it. I am so happy with this wall so far and even happier that I have only spent a total of $35.00 to date.

The best part of all? I have a BRIGHT and BEAUTIFUL place to work!